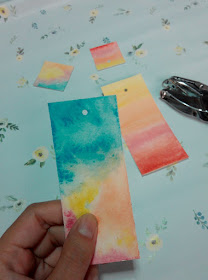
I've been hooked to watercolor painting and reading books lately that I thought why don't I mix them up together. So, I made this very simple and super easy DIY Watercolor Bookmarks. They are so cute and will surely spice up your reading time.
D I Y W A T E R C O L O R B O O K M A R K S
Things you need:
Watercolor paper, watercolors, paint brush, artist/paper tape, some water, strings and a puncher
What to do:
First, you need to decide what would be the size and shape of your bookmarks. Tip: to make it easy try making rectangular bookmarks as your first project.
Then, line the borders of your bookmarks with artist tape. This is to make sure the water will not spill all over the paper you are using.
After that, you can now spread some water on the paper. Make sure it is not too watery. Just enough to wet the whole space.
Then, start painting the design that you want.
On my first bookmark, I decided that I'll only mix vibrant colors. Without any pattern in mind, I randomly selected the colors and dip my brush on water and started painting.
For the second piece, I choose to have a sunset vibe so I used the sunset colors (yellow, orange, red and pink) and layer them on my paper. Remember you can have different shades from one color just by mixing it with different amount of water so just be playful!
Optional: I added two small squares to pair up with my rectangular bookmarks.
Once the paint and the paper dried up you can cut them out and punch a whole on top of your bookmarks.
Ahhh! Aren't they cute?
Then, tie up a string or ribbon. And you're all set! That easy!
This is so cool! It only took me about 10 mins to make these two cute DIY Watercolor Bookmarks. So try making your own to! Btw, I also did a different version of bookmarks a few months ago! You can check them out here! Have a nice day!


How Long Do Sew-On and Iron-On Embroidered Patches Last?
ReplyDeleteNot all patches are equal. Learn why sew-on embroidered patches can last decades, while iron-on or adhesive ones may peel over time. Discover key care tips to make your favorite patches last longer. rush patch dot com